


13 minutes, 33 seconds read
Published on Jan 21, 2020
Updated on May 10, 2020
Create superior customer experiences to enhance competitive advantage.
Go from zero to breakthrough with scalable, future-proof solutions.
Harness deep tech for smarter solutions and maximum impact.
Accelerate value delivery with powerful pre-built digital tools.
Help businesses connect with an internet first generation.
Test the smarter way: where precision meets efficiency.
Unlock real-time and personalized customer journeys for mobile first generation.
Turn data into decisive action with scalable AI infrastructure.
Design agile digital foundations that scale with tomorrow's business needs.
Build new-age architecture for maximum efficiency and hyper-growth.
Fine-tune your cloud infrastructure for peak performance.
Automated compliance and control for global regulations.

All
Customer Experience
Mantra
Application Development
Insurtech
Digital Health
Insurance
Deep-Tech
AgriTech(1)
Augmented Reality(21)
Clean Tech(9)
Customer Journey(17)
Design(45)
Solar Industry(8)
User Experience(68)
Edtech(10)
Events(34)
HR Tech(3)
Interviews(10)
Life@mantra(11)
Logistics(6)
Manufacturing(5)
Strategy(18)
Testing(9)
Android(48)
Backend(32)
Dev Ops(11)
Enterprise Solution(33)
Technology Modernization(9)
Frontend(29)
iOS(43)
Javascript(15)
AI in Insurance(41)
Insurtech(67)
Product Innovation(59)
Solutions(22)
E-health(12)
HealthTech(25)
mHealth(5)
Telehealth Care(4)
Telemedicine(5)
Artificial Intelligence(154)
Bitcoin(8)
Blockchain(19)
Cognitive Computing(8)
Computer Vision(8)
Data Science(24)
FinTech(51)
Banking(7)
Intelligent Automation(27)
Machine Learning(48)
Natural Language Processing(14)
You’ll be amazed to know that globally, nearly 62% of users access the internet through mobile last year. By the end of 2020, the number of smartphone users is going to reach 2.87 billion.
This is huge, isn’t it? But, this also raises a question — are desktop/web applications dying?
Developers frequently face this dilemma of which platform to learn for web/mobile app development. Fortunately, hybrid app development platforms and frameworks answer this question. Let me quickly walk you through hybrid mobile app creation before delving deeper into Ionic Framework.
You might have encountered terms like native and hybrid mobile apps. Developers use these terms to describe the underlying technology behind building the apps. A hybrid mobile app is built using technologies like HTML, CSS, and Javascript, which are compatible with web applications as well.
On the contrary, native apps are the ones that are developed on android/iOS technologies specifically. However, an external user cannot figure out whether an app is a hybrid or native.
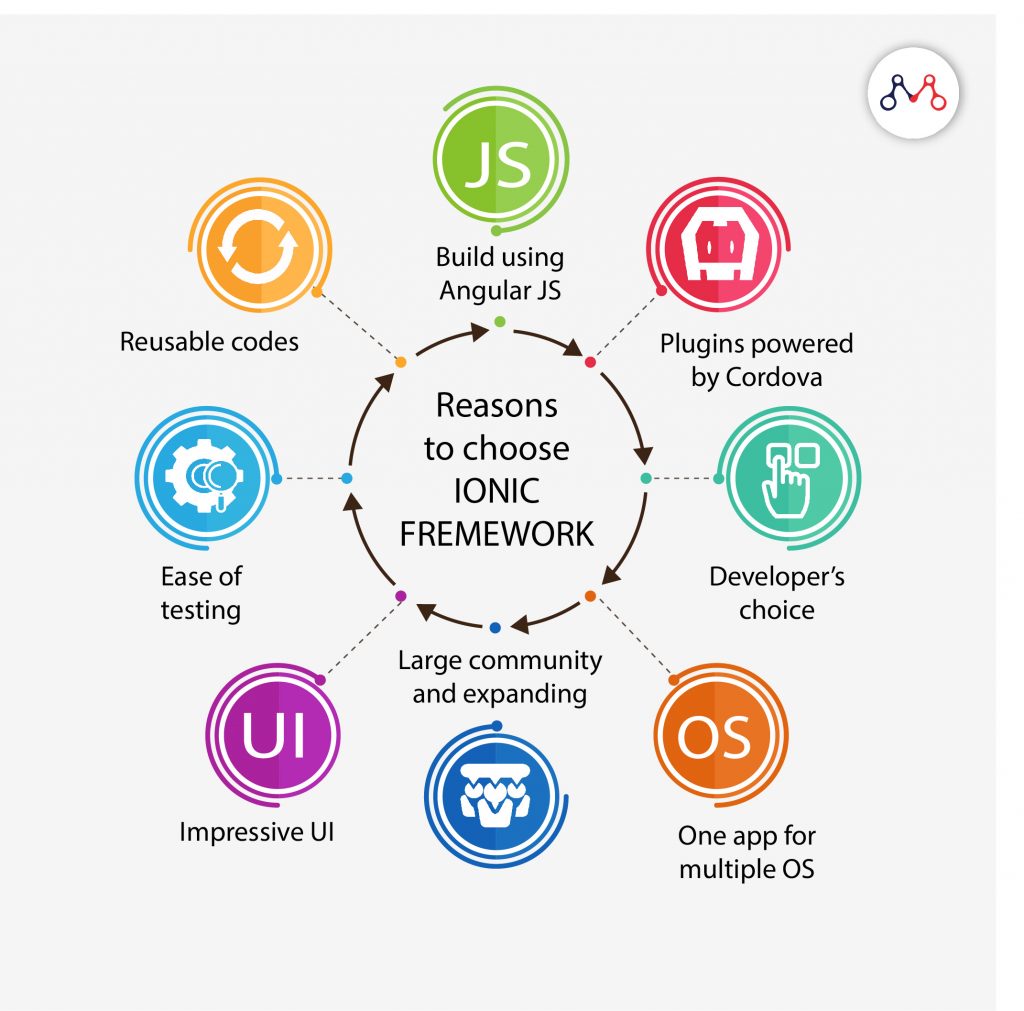
Many platforms and frameworks allow building impressive hybrid applications like Ionic, React Native, Xamarin, Onsen UI, PhoneGap, and Mobile Angular UI. In this article, we’ll discuss the Ionic Framework in depth. I’ll also explain why we’re choosing Ionic for hybrid app development. After reading this, you’ll be able to install Ionic SDK, build and run your apps from scratch.
Happy coding!
Ionic is one of the most popular frameworks for developing hybrid apps available today. Its complete source code is available on GitHub. With the Ionic framework, anyone can start creating effective android apps just with an idea, a computer, and an internet connection.
Did you notice — I didn’t mention pricing?
That’s true. You need not buy a license for Ionic. Thus, you can start developing apps for free.
Now let’s get started with Ionic Framework!
Let’s start with minimum basic requirements for building your app with the current release of Ionic. Currently, Ionic targets iPhone and Android devices supporting iOS 7+ and Android 4.1+. However, you’ll find some old Android devices, where Ionic apps might not work.
If you’re on Windows, make sure you download and install Git for Windows and optionally Console2. In this guide, you’ll be executing commands in Git Bash or Console2 windows.
First, we need to install the most recent version of Apache Cordova. It will take your app and bundle it into a native wrapper to turn it into a traditional native app.
To install Cordova, make sure you have Node.js installed and then run the command –
$ sudo npm install -g cordova
Special Notes:
Linux Android Note: If you’re using a 64-bit version of Ubuntu, install 32-bit libraries. It is because Android is only 32-bit at the moment. You can use the following command-
$ sudo apt-get install ia32-libs
If you’re on Ubuntu 13.04 or greater, ‘ia32-libs’ has been removed. You can use the following packages instead-
$ sudo apt-get install lib32z1 lib32ncurses5 lib32bz2-1.0
If you are running a 64-bit version of Fedora you’ll need to install the following 32-bit packages-
$ sudo yum install -y glibc.i686 glibc-devel.i686 libstdc++.i686 zlib-devel.i686 ncurses-devel.i686 libX11-devel.i686 libXrender.i686 libXrandr.i686
Windows note on Java, Ant, and Android: Install the most recent Java 8 JDK and not just the JRE. Currently, Cordova doesn’t support JDK 9.
Next, create an environment variable for JAVA_HOME. It should point to the root folder where the Java JDK is installed. For example, if you’ve installed the JDK into C:\Program\Files\Java\jdk7, set JAVA_HOME at this path. Post this, add the JDK’s bin directory to the PATH variable as well. As per previous assumption, it should be either %JAVA_HOME%\bin or the full path: C:\Program Files\Java\jdk7\bin
Apache Ant
To install Ant, download the zip file (here), extract it, and move the first folder in the zip to a safe place. After this, update your PATH to include the bin folder in that folder. For example, if you moved the Ant folder to C:/, you’d want to add this to your PATH:
C:\apache-ant-1.9.2\bin
Android SDK
It is important to install the Android SDK. Android SDK provides you API libraries and developer tools which are necessary to build, test, and debug Android apps.
You’ll need to set the ANDROID_HOME environment variable. Point this to [ANDROID_SDK_DIR]\android-sdk directory. For example,
C:\android\android-sdk
Next, you’ll need to update your PATH to include the tools/ and platform-tools/ folder in that folder. Therefore, using ANDROID_HOME, add both %ANDROID_HOME%\tools and %ANDROID_HOME%\platform-tools.
Install Ionic
Run the following command to install ionic:
$ sudo npm install -g ionic
$ ionic start todo blank –type ionic1
This will create a ‘todo’ folder in the directory where the command was run. Next, go into this directory and list the contents. This is how the outer structure of your ionic project will look like:
$ cd todo && ls
├── bower.json // bower dependencies
├── config.xml // cordova configuration
├── gulpfile.js // gulp tasks
├── hooks // custom cordova hooks to execute on specific commands
├── ionic.project // ionic configuration
├── package.json // node dependencies
├── platforms // iOS/Android specific builds will reside here
├── plugins // where your cordova/ionic plugins will be installed
├── scss // scss code, which will output to www/css/
└── www // application – JS code and libs, CSS, images, etc.
Next inform ionic that you want to enable iOS and Android platforms. Please note, unless you’re on macOS, leave out the iOS platform. So, run the following commands.
$ ionic cordova platform add ios
$ ionic cordova platform add android
Let’s now walk through the anatomy of an Ionic app. Inside the folder (we just now created), we’ve a typical Cordova project structure where we can install native plugins, and create platform-specific project files.
./src/index.html
src/index.html is the main entry point for the app, though its purpose is to set up scripts, CSS includes, and bootstrap, or start running our app. We won’t spend much of our time in this file.
For your app to function, Ionic looks for the <ion-app> tag in your HTML. In this example we have:
<ion-app></ion-app>
and the following scripts near the bottom:
<!– Ionic’s root component and where the app will load –>
<ion-app></ion-app>
<!– The polyfills js is generated during the build process –>
<script src=”build/polyfills.js”></script>
<!– The vendor js is generated during the build process
It contains all of the dependencies in node_modules –>
<script src=”build/vendor.js”></script>
<!– The main bundle js is generated during the build process –>
<script src=”build/main.js”></script>
These scripts are all generated by the build system, so no need to worry about them.
You’ll find your code inside the src directory. And you’ll be doing most of the work for an ionic app here. While running the ionic server, the code inside src/ is transpiled into the correct Javascript version, which a browser understands. Currently, it’s ES5. This means that we can work at a higher level using TypeScript, but we can also compile down to the older form of Javascript depending on the browser needs.
src/app/app.module.ts is the entry point for our app.
Near the top of the file, we should see this:
@NgModule({
declarations: [MyApp, HelloIonicPage, ItemDetailsPage, ListPage],
imports: [BrowserModule, IonicModule.forRoot(MyApp)],
bootstrap: [IonicApp],
entryComponents: [MyApp, HelloIonicPage, ItemDetailsPage, ListPage],
providers: [StatusBar, SplashScreen, {provide: ErrorHandler, useClass: IonicErrorHandler}]
})
export class AppModule {}
You’ll notice that every app has a root module, which controls the rest of the applications. You’ll find this very similar to ng-app from Ionic 1 and AngularJS. We’ll also bootstrap our app (using ionicBootstrap) from here.
Here we’ll discuss the main template for the app in src/app/app.html.
First, set the root component to MyApp in src/app/app.component.ts. This will be the first component to load in your app. Typically, it is an empty shell for other components to load into it. We’ll set our app.component.ts template to src/app/app.html. This is how it will look.
<ion-menu [content]=”content”>
<ion-header>
<ion-toolbar>
<ion-title>Pages</ion-title>
</ion-toolbar>
</ion-header>
<ion-content>
<ion-list>
<button ion-item *ngFor=”let p of pages” (click)=”openPage(p)”>
{{p.title}}
</button>
</ion-list>
</ion-content>
</ion-menu>
<ion-nav [root]=”rootPage” #content swipeBackEnabled=”false”></ion-nav>
Test it out:
To make sure that the default project works, try building and running the project (substitute iOS for android to build for Android instead):
$ ionic cordova build ios
$ ionic cordova emulate ios
Android Devices
Deploying to an Android device is a fairly straightforward process. If you have a working Android development environment, you’re ready to go.
Requirements:
Running Your App
Enable USB debugging and Developer Mode on your Android device. Then run ionic cordova run android — device from the command line.
This will produce a debug build of your app, both in terms of Android and Ionic’s code.
Please note that enabling USB debugging and Developer Mode may vary from device to device. However, it is easy to look up with a simple Google search. For details, you can check out – Enabling On-device Developer Options in the Android docs.
To run or build your app for production, run
ionic cordova run android –prod –release
(or)
ionic cordova build android –prod –release
This command will minify your app’s code as an ionic source. It will also remove any debugging capabilities from the APK. People generally use this while deploying an app to the Google Play Store.
For releasing your app in the Google Play Store — sign your APK file. For this, create a new certificate/keystore.
Let’s generate your private key using the keytool command that comes with the JDK:
keytool -genkey -v -keystore my-release-key.jks -keyalg RSA -keysize 2048 -validity 10000 -alias my-alias
Now, you’ll be prompted to create a password for the keystore. After answering the rest of the nice tool’s questions, you’ll have a file called — my-release-key.jks in the current directory.
Note: Make sure to save this file somewhere safe, if you lose it you won’t be able to submit updates to your app!
To sign the unsigned APK, run the jarsigner tool which is also included in the JDK:
jarsigner -verbose -sigalg SHA1withRSA -digestalg SHA1 -keystore my-release-key.jks app-release-unsigned.apk my-alias
After signing, one final step — you’ll need to run the zip align tool to optimize the APK. You’ll find this tool at-
/path/to/Android/sdk/build-tools/VERSION/zipalign.
For example, on OS X with Android Studio installed, zipalign is in ~/Library/Android/sdk/build-tools/VERSION/zipalign:
zipalign -v 4 app-release-unsigned.apk HelloWorld.apk
If you want to verify that your apk is signed, run apksigner. You can find this in the same path as the zipalign tool:
apksigner verify HelloWorld.apk
Now we have our final release binary called HelloWorld.apk and we can release this on the Google Play Store for all the world to enjoy!
iOS developers need to generate a provisioning profile for code signing their apps for testing. However, the good news is that you can develop and test your apps on your iOS device without a paid Apple Developer account in iOS9. This is particularly great for developers who want to try mobile development using the Ionic Framework.
You’ll require-
First of all, you’ll need to set up a provisioning profile for code signing your apps.
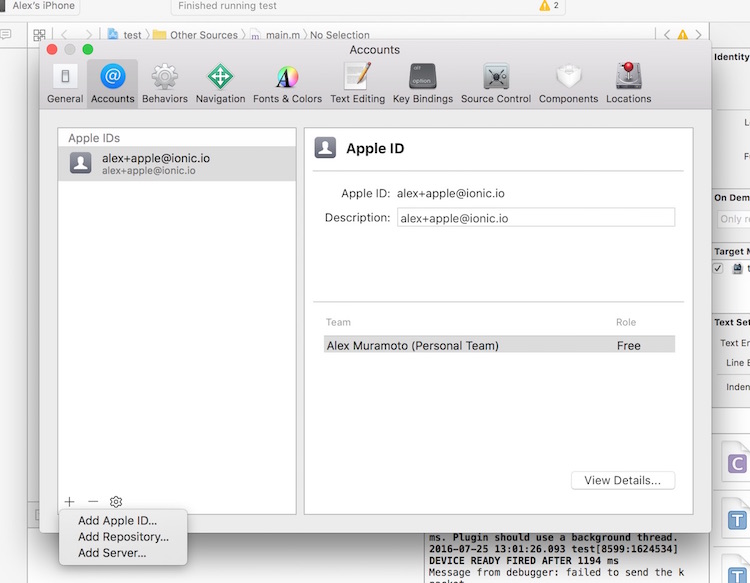
Using an Apple ID
Once you’ve logged in successfully, you’ll find a new ‘Personal team’ with the role ‘Free’ appearing beneath your Apple ID.
Oops, code signing error! No problem.
It totally depends on whether you’re using Xcode 8 or an earlier version…
Xcode 7 and Earlier
For this, you’ll get a code signing error. It will look like the following image when you try to run the app.
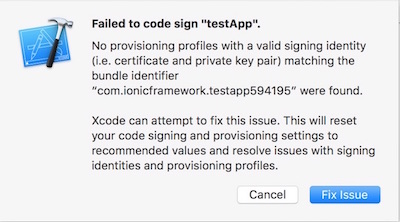
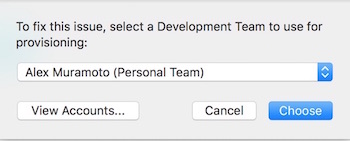
To fix this, click the “Fix Issue” button and then select your “Personal Team” profile.
Xcode 8
In Xcode 8, the code signing error will appear as a build-time error instead of a pop-up.
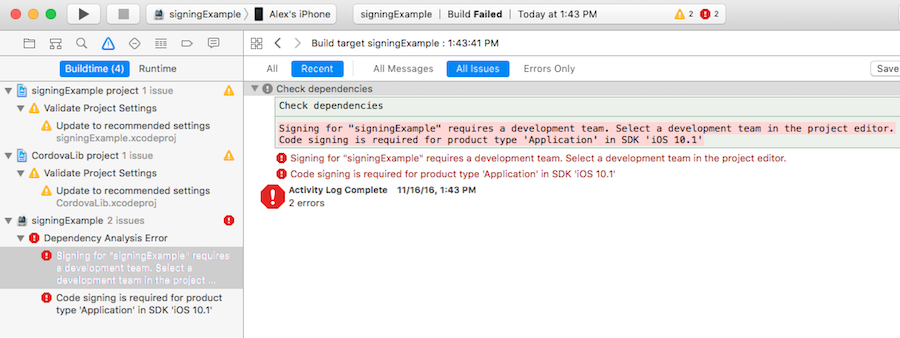
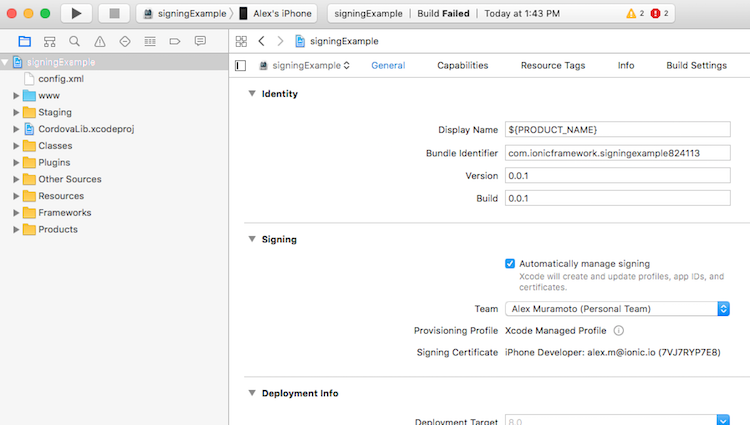
To select the certificate to sign your app with, do the following:
Trusting the Certificate
After code signing, you’ll get a launch error that looks like the following image. On Xcode 7 and below versions, you’ll see this automatically. On Xcode 8, it appears next time when you try to run the app.
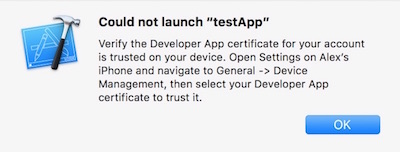
To remove this error, you’ll have to tell the iOS device to trust the certificate. You can do this in the following steps-
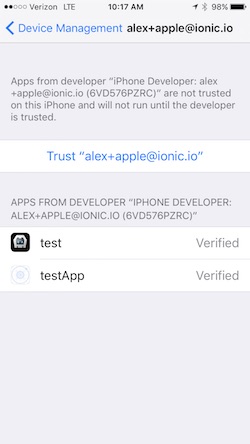
After this, go back to Xcode and hit the play button. Or you can run ionic cordova run ios –device from the command line to install and launch your app on your iOS device.
Yeoman is a scaffolding tool that allows you to quickly deploy pre-configured projects. A place to start is exploring some of the Ionic Yeoman generators to see if they meet your requirements.
Ionic Framework does have some excellent inclusions. But, you may want to customize your development environment with tools like javascript linters, code coverage support, emulators, and platform integrations to further improve your application. Yeoman generators also expose you to different folder structures, which you might find better than previous approaches.
It may be tempting to rush into things and throw new scss files into the www folder; somewhere near the code for the Ionic styles and then add a reference to your CSS file within the index.html.
Avoid that!
This won’t work with the Ionic Gulp set up. It’s a safe practice to not to add things in there.
Today, your app might be small and simple. But, it will eventually grow and you might want it to remain manageable. You might be concerned especially when a team of developers will be involved in the project.
Hence, I recommend splitting your app’s custom styles into a neater set of files. It should mirror Ionic’s sass files whenever we’re specifically overriding Ionic itself. You can put these custom app styles into their own sub folder, which will be easy to change/update later.
Now that you know that Ionic is the dominant hybrid mobile development framework, installing it, and using it is also easier as compared to other platforms. Do let me know if you have queries, I’ll be happy to help.
About the author: Anand Nanavaty is a Software Engineer at Mantra Labs. He has been involved in mobile app development for the company’s B2B clients. Apart from coding and experimenting with different application development frameworks, Anand likes trekking and hiking into the greens.
Related articles-
Knowledge thats worth delivered in your inbox
Smart Manufacturing starts with real-time visibility.
Manufacturing companies today generate data by the second through sensors, machines, ERP systems, and MES platforms. But without real-time insights, even the most advanced production lines are essentially flying blind.
Manufacturers are implementing real-time dashboards that serve as control towers for their daily operations, enabling them to shift from reactive to proactive decision-making. These tools are essential to the evolution of Smart Manufacturing, where connected systems, automation, and intelligent analytics come together to drive measurable impact.
Data is available, but what’s missing is timely action.
For many plant leaders and COOs, one challenge persists: operational data is dispersed throughout systems, delayed, or hidden in spreadsheets. And this delay turns into a liability.
Real-time dashboards help uncover critical answers:
By converting raw inputs into real-time manufacturing analytics, dashboards make operational intelligence accessible to operators, supervisors, and leadership alike, enabling teams to anticipate problems rather than react to them.
Line performance and downtime trends
Track OEE in real time and identify underperforming lines.
Predictive maintenance alerts
Utilize historical and sensor data to identify potential part failures in advance.
Inventory heat maps & reorder thresholds
Anticipate stockouts or overstocks based on dynamic reorder points.
Quality metrics linked to operator actions
Isolate shifts or procedures correlated with spikes in defects or rework.
These insights allow production teams to drive day-to-day operations in line with Smart Manufacturing principles.
Role-based dashboards
Dashboards can be configured for machine operators, shift supervisors, and plant managers, each with a tailored view of KPIs.
Embedded alerts and nudges
Real-time prompts, like “Line 4 below efficiency threshold for 15+ minutes,” reduce response times and minimize disruptions.
Cross-functional drill-downs
Teams can identify root causes more quickly because users can move from plant-wide overviews to detailed machine-level data in seconds.
Data lakehouse integration
Unified access to ERP, MES, IoT sensor, and QA systems—ensuring reliable and timely manufacturing analytics.
ETL pipelines
Real-time data ingestion from high-frequency sources with minimal latency.
Visualization tools
Custom builds using Power BI, or customized solutions designed for frontline usability and operational impact.
Mantra Labs partnered with a North American die-casting manufacturer to unify its operational data into a real-time dashboard. Fragmented data, manual reporting, delayed pricing decisions, and inconsistent data quality hindered operational efficiency and strategic decision-making.
As this case shows, real-time dashboards are not just operational tools—they’re strategic enablers.
(Learn More: Powering the Future of Metal Manufacturing with Data Engineering)
| Aspect | What You Should Know |
| 1. Why Static Reports Fall Short | Delayed insights after issues occur Disconnected systems (ERP, MES, sensors) No real-time alerts or embedded decision logic |
| 2. What Real-Time Dashboards Enable | Track OEE and downtime in real-time Predictive maintenance using sensor data Dynamic inventory heat maps Quality linked to operators |
| 3. Dashboards That Drive Action | Role-based views (operator to CEO) Embedded alerts like “Line 4 down for 15+ mins” Drilldowns from plant-level to machine-level |
| 4. What Powers These Dashboards | Unified Data Lakehouse (ERP + IoT + MES) Real-time ETL pipelines Power BI or custom dashboards built for frontline usability |
Smart Manufacturing dashboards aren’t just analytics tools—they’re productivity engines. Dashboards that deliver real-time insight empower frontline teams to make faster, better decisions—whether it’s adjusting production schedules, triggering preventive maintenance, or responding to inventory fluctuations.
Explore how Mantra Labs can help you unlock operations intelligence that’s actually usable.
Knowledge thats worth delivered in your inbox


Our Sales Team will be in touch with you shortly.

Hello Stranger! Please fill in a few details,and you’ll receive a link to this case study.
 We have mailed you this case study.
Thanks for subscribing.
