You’ll be amazed to know that globally, nearly 62% of users access the internet through mobile last year. By the end of 2020, the number of smartphone users is going to reach 2.87 billion.
This is huge, isn’t it? But, this also raises a question — are desktop/web applications dying?
Developers frequently face this dilemma of which platform to learn for web/mobile app development. Fortunately, hybrid app development platforms and frameworks answer this question. Let me quickly walk you through hybrid mobile app creation before delving deeper into Ionic Framework.
What is a hybrid mobile app?
You might have encountered terms like native and hybrid mobile apps. Developers use these terms to describe the underlying technology behind building the apps. A hybrid mobile app is built using technologies like HTML, CSS, and Javascript, which are compatible with web applications as well.
On the contrary, native apps are the ones that are developed on android/iOS technologies specifically. However, an external user cannot figure out whether an app is a hybrid or native.
Many platforms and frameworks allow building impressive hybrid applications like Ionic, React Native, Xamarin, Onsen UI, PhoneGap, and Mobile Angular UI. In this article, we’ll discuss the Ionic Framework in depth. I’ll also explain why we’re choosing Ionic for hybrid app development. After reading this, you’ll be able to install Ionic SDK, build and run your apps from scratch.
Happy coding!
Why Ionic Framework?
Ionic is one of the most popular frameworks for developing hybrid apps available today. Its complete source code is available on GitHub. With the Ionic framework, anyone can start creating effective android apps just with an idea, a computer, and an internet connection.
Did you notice — I didn’t mention pricing?
That’s true. You need not buy a license for Ionic. Thus, you can start developing apps for free.
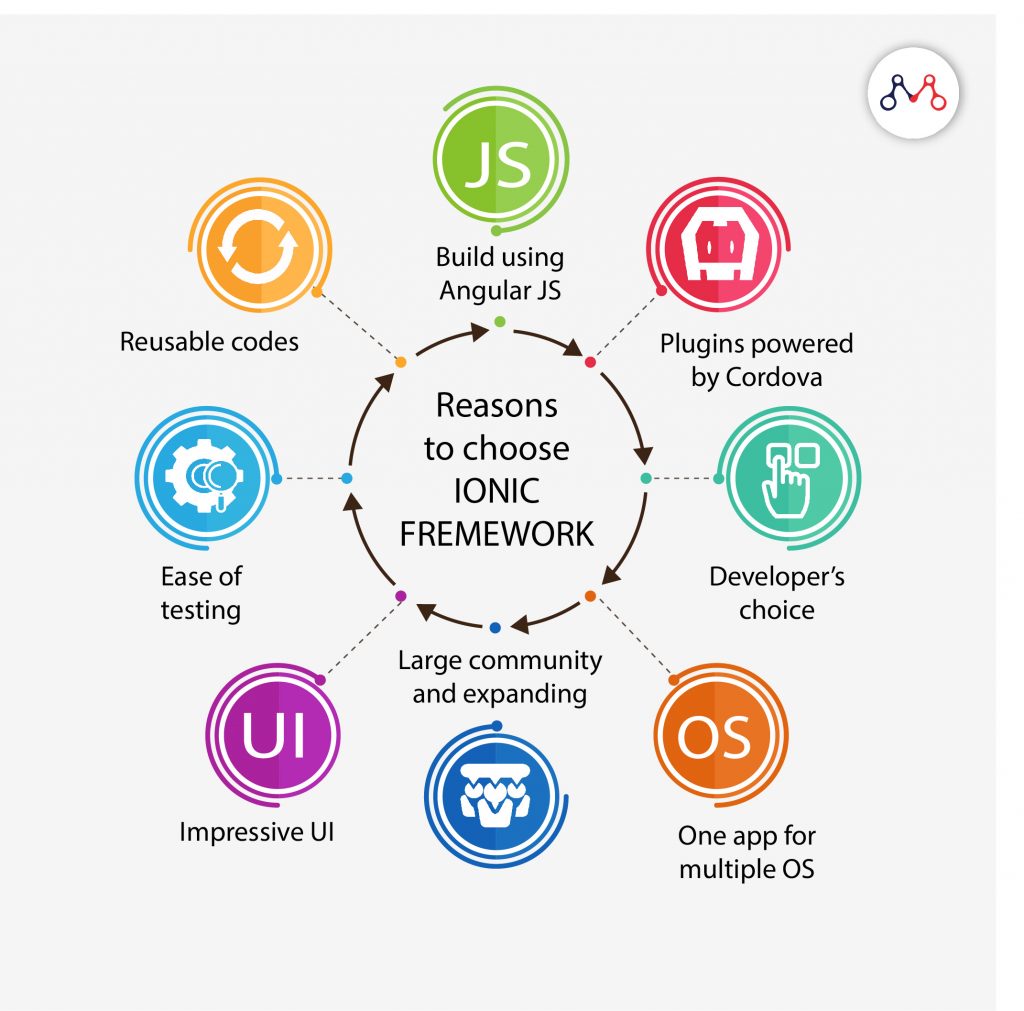
- Cross-platform: The application you develop once in Ionic is compatible with web, Android, iOS, Windows, and some other operating systems. You’ll only need a handy knowledge of Javascript. Also read – Trending Javascript Frameworks for 2020
- Frontend development: Ionic uses AngularJS for front-end development. Angular’s CSS and Javascript features allow you to customize your app with buttons, menus, and several attractive color schemes. You can apply derivative and UI elements while you launch your app on different platforms and whoa! Your app just now got a native look.
- Developers community: With a vast and active community, you’ll always find help at hand for any problem you face while developing apps on Ionic.
- Cordova plugins: This is one of the best parts of Ionic app development. It opens the doors to native device capabilities beyond pure web applications. With Cordova, you get access to logs, battery, geolocation, camera, etc. to enhance your app performance. And you can avail these all by adding just a few simple codes.
- Code reusability: Once you’ve developed an app, you can use the same code with slight changes to build an entirely new app. This will help you a lot in improving your TAT (Turn around time).
- Testing: Testers can easily run the script using Cordova commands for both iOS and Android.
Now let’s get started with Ionic Framework!
Quick Installation Guide for Ionic & Components
Let’s start with minimum basic requirements for building your app with the current release of Ionic. Currently, Ionic targets iPhone and Android devices supporting iOS 7+ and Android 4.1+. However, you’ll find some old Android devices, where Ionic apps might not work.
If you’re on Windows, make sure you download and install Git for Windows and optionally Console2. In this guide, you’ll be executing commands in Git Bash or Console2 windows.
First, we need to install the most recent version of Apache Cordova. It will take your app and bundle it into a native wrapper to turn it into a traditional native app.
To install Cordova, make sure you have Node.js installed and then run the command –
$ sudo npm install -g cordova
Special Notes:
Linux Android Note: If you’re using a 64-bit version of Ubuntu, install 32-bit libraries. It is because Android is only 32-bit at the moment. You can use the following command-
$ sudo apt-get install ia32-libs
If you’re on Ubuntu 13.04 or greater, ‘ia32-libs’ has been removed. You can use the following packages instead-
$ sudo apt-get install lib32z1 lib32ncurses5 lib32bz2-1.0
If you are running a 64-bit version of Fedora you’ll need to install the following 32-bit packages-
$ sudo yum install -y glibc.i686 glibc-devel.i686 libstdc++.i686 zlib-devel.i686 ncurses-devel.i686 libX11-devel.i686 libXrender.i686 libXrandr.i686
Windows note on Java, Ant, and Android: Install the most recent Java 8 JDK and not just the JRE. Currently, Cordova doesn’t support JDK 9.
Next, create an environment variable for JAVA_HOME. It should point to the root folder where the Java JDK is installed. For example, if you’ve installed the JDK into C:\Program\Files\Java\jdk7, set JAVA_HOME at this path. Post this, add the JDK’s bin directory to the PATH variable as well. As per previous assumption, it should be either %JAVA_HOME%\bin or the full path: C:\Program Files\Java\jdk7\bin
Apache Ant
To install Ant, download the zip file (here), extract it, and move the first folder in the zip to a safe place. After this, update your PATH to include the bin folder in that folder. For example, if you moved the Ant folder to C:/, you’d want to add this to your PATH:
C:\apache-ant-1.9.2\bin
Android SDK
It is important to install the Android SDK. Android SDK provides you API libraries and developer tools which are necessary to build, test, and debug Android apps.
You’ll need to set the ANDROID_HOME environment variable. Point this to [ANDROID_SDK_DIR]\android-sdk directory. For example,
C:\android\android-sdk
Next, you’ll need to update your PATH to include the tools/ and platform-tools/ folder in that folder. Therefore, using ANDROID_HOME, add both %ANDROID_HOME%\tools and %ANDROID_HOME%\platform-tools.
Install Ionic
Run the following command to install ionic:
$ sudo npm install -g ionic
Create the project
$ ionic start todo blank –type ionic1
This will create a ‘todo’ folder in the directory where the command was run. Next, go into this directory and list the contents. This is how the outer structure of your ionic project will look like:
$ cd todo && ls
├── bower.json // bower dependencies
├── config.xml // cordova configuration
├── gulpfile.js // gulp tasks
├── hooks // custom cordova hooks to execute on specific commands
├── ionic.project // ionic configuration
├── package.json // node dependencies
├── platforms // iOS/Android specific builds will reside here
├── plugins // where your cordova/ionic plugins will be installed
├── scss // scss code, which will output to www/css/
└── www // application – JS code and libs, CSS, images, etc.
Configure Platforms
Next inform ionic that you want to enable iOS and Android platforms. Please note, unless you’re on macOS, leave out the iOS platform. So, run the following commands.
$ ionic cordova platform add ios
$ ionic cordova platform add android
Basic code structure in the Ionic Framework
Let’s now walk through the anatomy of an Ionic app. Inside the folder (we just now created), we’ve a typical Cordova project structure where we can install native plugins, and create platform-specific project files.
./src/index.html
src/index.html is the main entry point for the app, though its purpose is to set up scripts, CSS includes, and bootstrap, or start running our app. We won’t spend much of our time in this file.
For your app to function, Ionic looks for the <ion-app> tag in your HTML. In this example we have:
<ion-app></ion-app>
and the following scripts near the bottom:
<!– Ionic’s root component and where the app will load –>
<ion-app></ion-app>
<!– The polyfills js is generated during the build process –>
<script src=”build/polyfills.js”></script>
<!– The vendor js is generated during the build process
It contains all of the dependencies in node_modules –>
<script src=”build/vendor.js”></script>
<!– The main bundle js is generated during the build process –>
<script src=”build/main.js”></script>
These scripts are all generated by the build system, so no need to worry about them.
./src/
You’ll find your code inside the src directory. And you’ll be doing most of the work for an ionic app here. While running the ionic server, the code inside src/ is transpiled into the correct Javascript version, which a browser understands. Currently, it’s ES5. This means that we can work at a higher level using TypeScript, but we can also compile down to the older form of Javascript depending on the browser needs.
src/app/app.module.ts is the entry point for our app.
Near the top of the file, we should see this:
@NgModule({
declarations: [MyApp, HelloIonicPage, ItemDetailsPage, ListPage],
imports: [BrowserModule, IonicModule.forRoot(MyApp)],
bootstrap: [IonicApp],
entryComponents: [MyApp, HelloIonicPage, ItemDetailsPage, ListPage],
providers: [StatusBar, SplashScreen, {provide: ErrorHandler, useClass: IonicErrorHandler}]
})
export class AppModule {}
You’ll notice that every app has a root module, which controls the rest of the applications. You’ll find this very similar to ng-app from Ionic 1 and AngularJS. We’ll also bootstrap our app (using ionicBootstrap) from here.
./src/app/app.html
Here we’ll discuss the main template for the app in src/app/app.html.
First, set the root component to MyApp in src/app/app.component.ts. This will be the first component to load in your app. Typically, it is an empty shell for other components to load into it. We’ll set our app.component.ts template to src/app/app.html. This is how it will look.
<ion-menu [content]=”content”>
<ion-header>
<ion-toolbar>
<ion-title>Pages</ion-title>
</ion-toolbar>
</ion-header>
<ion-content>
<ion-list>
<button ion-item *ngFor=”let p of pages” (click)=”openPage(p)”>
{{p.title}}
</button>
</ion-list>
</ion-content>
</ion-menu>
<ion-nav [root]=”rootPage” #content swipeBackEnabled=”false”></ion-nav>
Test it out:
To make sure that the default project works, try building and running the project (substitute iOS for android to build for Android instead):
$ ionic cordova build ios
$ ionic cordova emulate ios
Deployment
Android Devices
Deploying to an Android device is a fairly straightforward process. If you have a working Android development environment, you’re ready to go.
Requirements:
Running Your App
Enable USB debugging and Developer Mode on your Android device. Then run ionic cordova run android — device from the command line.
This will produce a debug build of your app, both in terms of Android and Ionic’s code.
Please note that enabling USB debugging and Developer Mode may vary from device to device. However, it is easy to look up with a simple Google search. For details, you can check out – Enabling On-device Developer Options in the Android docs.
Production Builds
To run or build your app for production, run
ionic cordova run android –prod –release
(or)
ionic cordova build android –prod –release
This command will minify your app’s code as an ionic source. It will also remove any debugging capabilities from the APK. People generally use this while deploying an app to the Google Play Store.
Sign Android APK
For releasing your app in the Google Play Store — sign your APK file. For this, create a new certificate/keystore.
Let’s generate your private key using the keytool command that comes with the JDK:
keytool -genkey -v -keystore my-release-key.jks -keyalg RSA -keysize 2048 -validity 10000 -alias my-alias
Now, you’ll be prompted to create a password for the keystore. After answering the rest of the nice tool’s questions, you’ll have a file called — my-release-key.jks in the current directory.
Note: Make sure to save this file somewhere safe, if you lose it you won’t be able to submit updates to your app!
To sign the unsigned APK, run the jarsigner tool which is also included in the JDK:
jarsigner -verbose -sigalg SHA1withRSA -digestalg SHA1 -keystore my-release-key.jks app-release-unsigned.apk my-alias
After signing, one final step — you’ll need to run the zip align tool to optimize the APK. You’ll find this tool at-
/path/to/Android/sdk/build-tools/VERSION/zipalign.
For example, on OS X with Android Studio installed, zipalign is in ~/Library/Android/sdk/build-tools/VERSION/zipalign:
zipalign -v 4 app-release-unsigned.apk HelloWorld.apk
If you want to verify that your apk is signed, run apksigner. You can find this in the same path as the zipalign tool:
apksigner verify HelloWorld.apk
Now we have our final release binary called HelloWorld.apk and we can release this on the Google Play Store for all the world to enjoy!
iOS Devices
iOS developers need to generate a provisioning profile for code signing their apps for testing. However, the good news is that you can develop and test your apps on your iOS device without a paid Apple Developer account in iOS9. This is particularly great for developers who want to try mobile development using the Ionic Framework.
You’ll require-
- Xcode 7 or higher
- iOS9
Creating a Provisioning Profile
First of all, you’ll need to set up a provisioning profile for code signing your apps.
Using an Apple ID
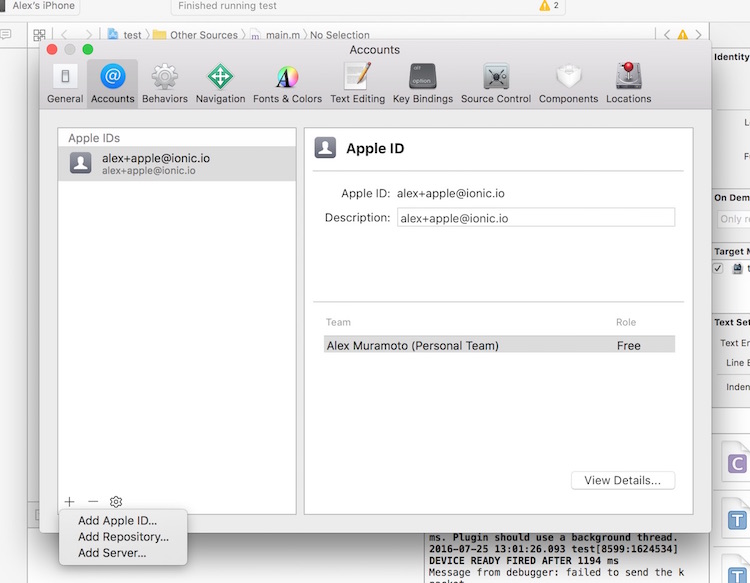
- Open Xcode preferences (Xcode > Preferences…)
- Click the ‘Accounts’ tab
- Log in with your Apple ID (+ > Add Apple ID…)
Once you’ve logged in successfully, you’ll find a new ‘Personal team’ with the role ‘Free’ appearing beneath your Apple ID.
Running Your App
- Run a production build of your app with ionic cordova build ios –prod
- Open the .xcodeproj file in platforms/ios/ in Xcode
- Then connect your phone with USB. Select your phone as the run target.
- Click the play button in Xcode
Oops, code signing error! No problem.
Code Signing Your App
It totally depends on whether you’re using Xcode 8 or an earlier version…
Xcode 7 and Earlier
For this, you’ll get a code signing error. It will look like the following image when you try to run the app.
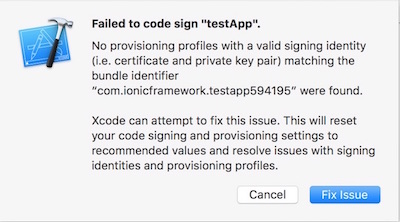
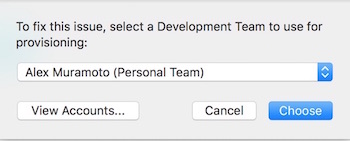
To fix this, click the “Fix Issue” button and then select your “Personal Team” profile.
Xcode 8
In Xcode 8, the code signing error will appear as a build-time error instead of a pop-up.
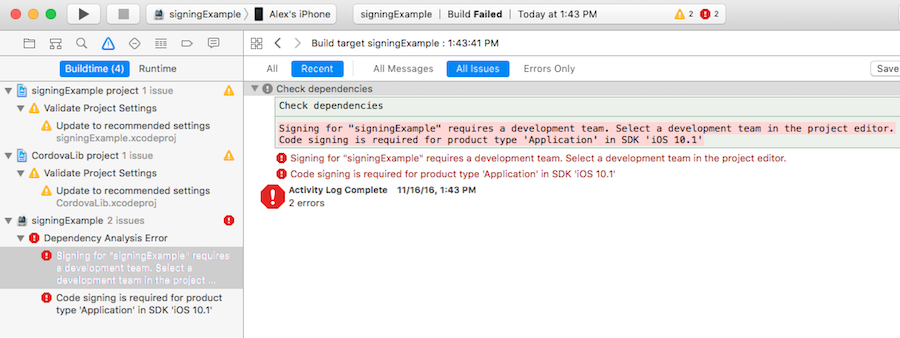
To select the certificate to sign your app with, do the following:
- Go to the ‘Project Editor’ by clicking the name of your project in the ‘Project Navigator’
- Select the ‘General’ section
- Select the team associate with your signing certificate from the ‘Team’ dropdown in the ‘Signing’ section
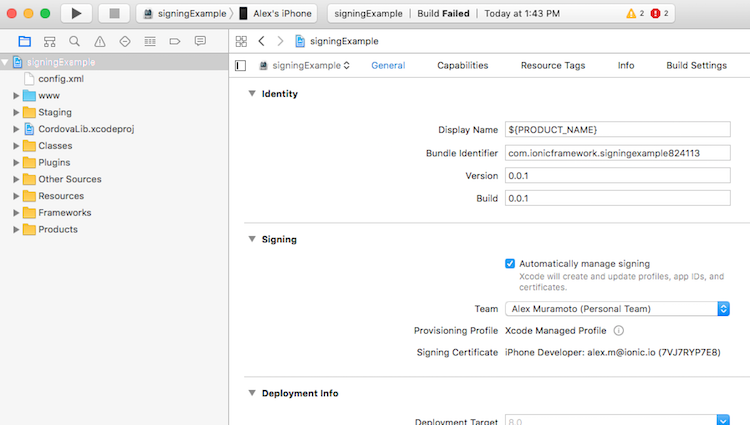
Trusting the Certificate
After code signing, you’ll get a launch error that looks like the following image. On Xcode 7 and below versions, you’ll see this automatically. On Xcode 8, it appears next time when you try to run the app.
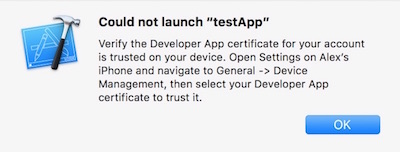
To remove this error, you’ll have to tell the iOS device to trust the certificate. You can do this in the following steps-
- On your iOS device, open the ‘Settings’ app
- Then, go to General>Device Management. Here, you’ll find the email address associated with your Apple ID or Apple Developer account, which you used while code signing your app.
- Tap the email address
- Tap ‘Trust <your_email>’:
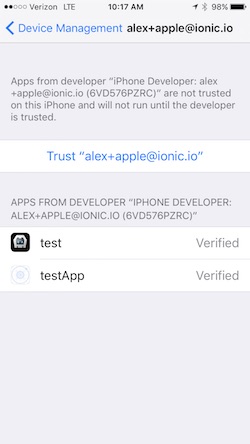
After this, go back to Xcode and hit the play button. Or you can run ionic cordova run ios –device from the command line to install and launch your app on your iOS device.
Additional tips while using the Ionic Framework
1. Use or create a yeoman generator
Yeoman is a scaffolding tool that allows you to quickly deploy pre-configured projects. A place to start is exploring some of the Ionic Yeoman generators to see if they meet your requirements.
Ionic Framework does have some excellent inclusions. But, you may want to customize your development environment with tools like javascript linters, code coverage support, emulators, and platform integrations to further improve your application. Yeoman generators also expose you to different folder structures, which you might find better than previous approaches.
2. Just put styles in www?
It may be tempting to rush into things and throw new scss files into the www folder; somewhere near the code for the Ionic styles and then add a reference to your CSS file within the index.html.
Avoid that!
This won’t work with the Ionic Gulp set up. It’s a safe practice to not to add things in there.
3. Put your custom app styles into their own folder
Today, your app might be small and simple. But, it will eventually grow and you might want it to remain manageable. You might be concerned especially when a team of developers will be involved in the project.
Hence, I recommend splitting your app’s custom styles into a neater set of files. It should mirror Ionic’s sass files whenever we’re specifically overriding Ionic itself. You can put these custom app styles into their own sub folder, which will be easy to change/update later.
Now that you know that Ionic is the dominant hybrid mobile development framework, installing it, and using it is also easier as compared to other platforms. Do let me know if you have queries, I’ll be happy to help.
About the author: Anand Nanavaty is a Software Engineer at Mantra Labs. He has been involved in mobile app development for the company’s B2B clients. Apart from coding and experimenting with different application development frameworks, Anand likes trekking and hiking into the greens.
Related articles-
Knowledge thats worth delivered in your inbox


